How to Put Two Images Side by Side: 5 Methods That Work
Five reliable ways to put two images side by side on iPhone, Android, Mac, Windows and in a browser — plus how to handle mismatched aspect ratios and when a side-by-side should really be a single merged photo.
Working out how to put two images side by side sounds trivial until you are doing it on a phone at eleven at night. This guide covers five methods that genuinely work, the layout decision that comes first, and the aspect-ratio problem that catches almost everyone.
First, settle what you actually want
There are two different outcomes hiding behind the same request, and picking the wrong one wastes an evening.
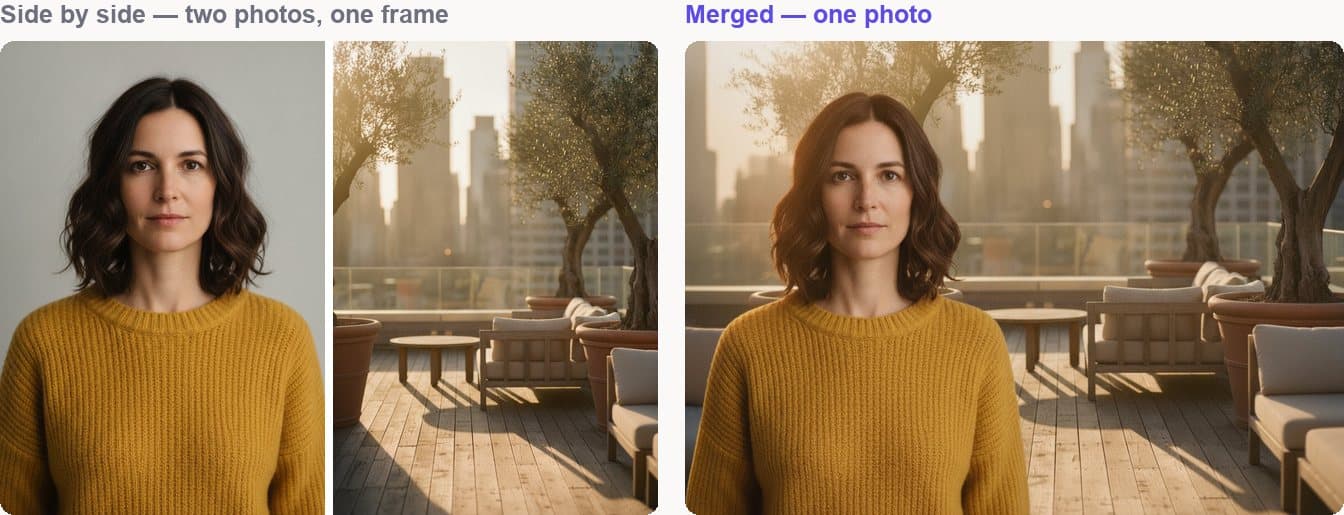
Side by side keeps both photographs whole and shows them together. Use it for before and after, two product colourways, a comparison of any kind, or a mixture of pictures from one trip. Every method below does this.
Combined means one photograph containing elements of both, with no seam — the subject from one photo genuinely standing in the scene from the other. That is a different tool entirely, covered in how to AI combine two images.
If you want your reader to compare two things, you want side by side. If you want them to believe one thing, you want a merge.
Choose the layout before you start
Three arrangements cover almost everything, and the right one depends mostly on where the image will be seen.
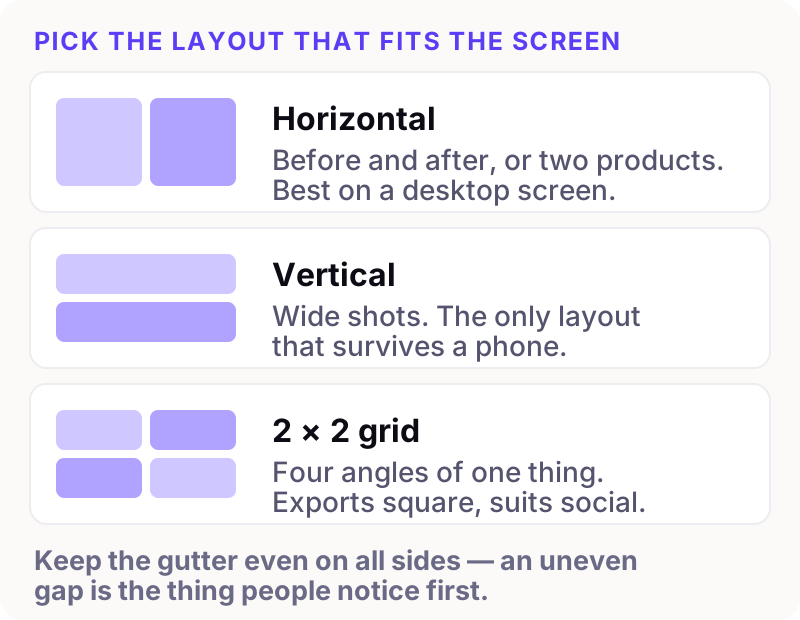
Horizontal is the default and the right choice for before-and-after on a desktop screen. It is also the worst choice for anything that will be read on a phone, where each half ends up around 170 pixels wide.
Vertical is underrated. If your images are wide, or the person looking is on a phone, stacking keeps both images at full width and readable.
A 2 × 2 grid suits four images of one subject and exports square, which fits most social platforms without further cropping.
The aspect-ratio problem
Two photos are rarely the same shape. One portrait, one landscape, and suddenly the layout looks broken. There are exactly three ways out, and one of them is always wrong.
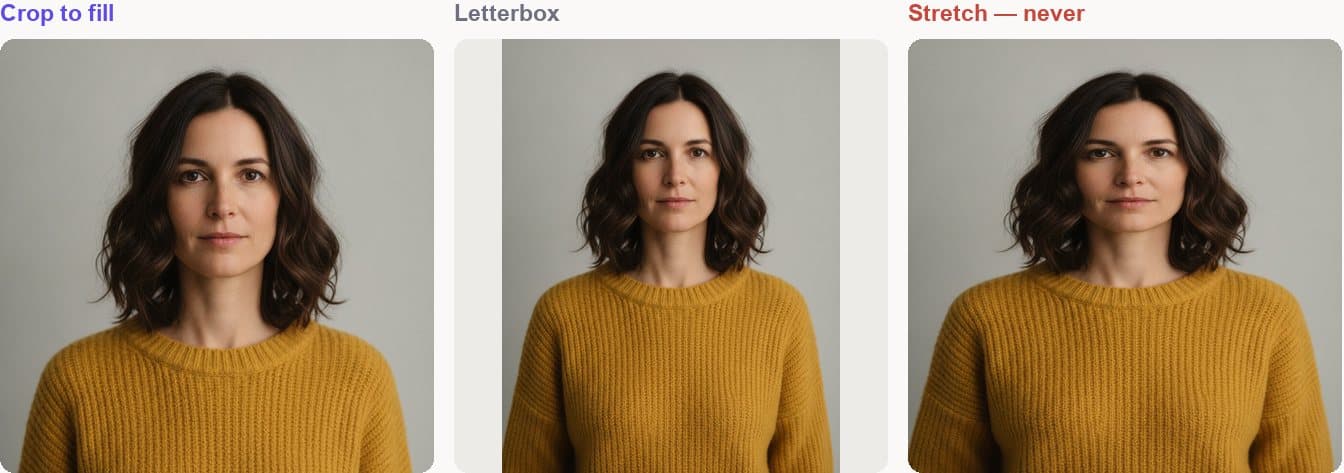
Crop to fill is usually right. Both images get cut to the same shape, and you keep control of what gets cut by choosing where to crop from. For portraits, crop from the top so you do not lose the top of someone's head.
Letterbox keeps every pixel and pads the difference with a plain colour. Use it when the full frame genuinely matters — architecture, documents, artwork. Pick a padding colour from the image rather than defaulting to white.
Stretch distorts the subject to fit. It is the fastest option and it always looks wrong, particularly on faces. Nobody is fooled.
Five methods
1. iPhone — the Shortcuts app
The Photos app cannot do this, which is why people give up. Shortcuts can, and it is built in.
- Open Shortcuts, tap + to make a new shortcut.
- Add the action Select Photos, and turn on “Select Multiple”.
- Add Combine Images. Set the mode to Horizontally, Vertically or Grid, and set the spacing.
- Add Save to Photo Album.
- Name it and run it. It stays in your Shortcuts list, so this is a one-time setup.
Worth doing once. After that it is three taps forever.
2. Android — Google Photos
Google Photos has this built in and it takes under a minute.
- Open Google Photos and select two photos.
- Tap the + or Add to button, then choose Collage.
- Save. The result lands in your library.
The trade-off is control: you get the layout Google picks, and gutter width is not adjustable. Fine for sharing, less good for anything that needs to match a brand.
3. Mac — Shortcuts, not Preview
Preview is the obvious app and it is the wrong one; it has no way to extend a canvas. macOS has the same Shortcuts app as iOS, with the same Combine Images action, and it is the cleanest route:
- Open Shortcuts and create a new shortcut.
- Add Combine Images, set the mode and spacing.
- Run it, then drag your two files onto the shortcut window.
If you would rather not build anything, dropping both images into a Pages or Keynote document, arranging them and exporting as an image also works and gives you precise control over spacing.
4. Windows — Paint
Paint has done this reliably for thirty years.
- Open the first image in Paint.
- Press Ctrl+E and note the width and height.
- Set the width to roughly double, plus the gap you want. Press OK — the canvas extends to the right with white.
- Choose Paste → Paste from, pick the second image, and drag it into the empty space.
- Save as PNG.
Unglamorous and completely dependable. For a vertical stack, double the height instead of the width.
5. In a browser
Any browser-based layout tool does this without an install, which matters on a work machine where you cannot install anything. The thing to check before you upload is what happens to your files afterwards — free collage sites are rarely free for reasons that have nothing to do with generosity. We wrote about what to look for in any image tool's terms.
Getting the details right
The difference between a side-by-side that looks deliberate and one that looks rushed comes down to three things.

Keep the gutter even. An uneven gap is the thing people notice first, even when they cannot say why. If you have a gap between the images, use the same gap around the outside, or use no outer gap at all. Do not mix.
Match the heights exactly. If one image is four pixels taller, it will look like a mistake rather than a choice.
Skip the border. Drop shadows and thin grey outlines were a 2011 habit. Two photos on a clean background look more current and reproduce better when a platform recompresses them.
Export as PNG if there is text in either image, JPEG at quality 85 or higher if there is not. Screenshots recompressed as low-quality JPEG are where crisp text goes to die.
When a mixture of pictures should become one picture
There is a specific case where side by side is the wrong answer and people persist with it anyway: when the two photos are meant to show one moment.
Two people photographed separately, placed next to each other, still reads as two photographs of two people. Nobody looks at it and sees them together, because the frame edge between them says otherwise. The same is true of a product shot beside a room photo — a viewer sees a product and a room, not a product in a room.
When the two pictures are meant to be one, they have to become one. That is what an AI image combiner is for: it removes the seam, relights the subject to match the scene, and returns a single photograph rather than a pair. You can load both images and set it up in the Image Combiner before creating an account.
In short
The short version of how to put two images side by side: decide first whether you want a comparison or a photograph. For a comparison, pick a layout that suits the screen it will be read on, crop both images to the same shape, keep the gutter even, and use whichever of the five methods above matches the device in your hand — Shortcuts on iPhone and Mac, Google Photos on Android, Paint on Windows.
And if what you actually wanted was for the two photos to be one photo, no layout will get you there. That job needs a different tool, and it is the one we build — see how it works.